Editor’s Note: Last modified on November 7, 2025, by Lucy
What Is 3D Printing?
Are you trying to validate a new part design, but worried about wasting thousands on CNC machining or molds for a part that isn’t finalized?
3D printing, or Additive Manufacturing, is a process that builds a three-dimensional object, layer by layer, directly from a digital file. It is the fastest, most cost-effective way to create physical prototypes and complex, low-volume parts.

I have been working in the machining industry for over 20 years, and I’ve seen 3D printing evolve from a novelty into one of the most powerful tools on my shop floor. For engineers and sourcing managers, it’s a game-changer. But it’s also surrounded by hype. My job isn’t to sell you on a specific machine; it’s to help you make the right choice to get your part made, fast. 3D printing isn’t the solution for everything. It’s a tool. And the key to success is knowing when and how to use it.
How Does the 3D Printing Process Actually Work?
It seems like magic, but the process is simple. How do we take your idea from a 3D model on a screen to a part you can hold in your hand?
The 3D printing process involves three simple steps: 1. Slicing a 3D CAD model into layers, 2. Sending these instructions to the printer, and 3. The printer building the part layer-by-layer.

Delve into the 3D printing process:
No matter what high-tech machine is being used, the basic process is always the same. For an engineer or designer, this is what you’re doing on your end, and what we do on ours.
- You Design the Part: It all starts with your 3D CAD (Computer-Aided Design) model. You design your part in a program like SolidWorks, Fusion 360, or Catia.
- You Export an STL File: This is the key step. You export your model as an STL file. This file format simplifies your complex model into a mesh of triangles, which is the universal language that all 3D printing software understands.
- We “Slice” the Part: We import your STL file into our “slicing” software. This is where our expertise comes in. We decide on the layer thickness, the material, and—most importantly—the orientation of the part to get the best strength and surface finish. The software then slices your model into thousands of thin, horizontal layers, like a high-tech deck of cards.
- We Print: We send this G-code file (the sliced layers) to the 3D printer. The machine then builds your part, one layer at a time, from the bottom up.
- We Post-Process: The part comes off the machine, and we clean it. This can involve washing away support material, curing the part in UV light (for SLA), or bead-blasting it (for SLS).
What Are the Most Common 3D Printing Technologies?
Confused by all the acronyms like FDM, SLA, and DMLS? There are dozens, but for 99% of engineering jobs, you only need to know four of them.
The most common technologies are FDM (for basic mockups), SLA (for smooth surfaces), SLS (for durable plastic parts), and DMLS (for printing in metal).
Explore Four Types of 3D Printing Technologies
I tell my clients not to get lost in the jargon. The “best” method is just the one that matches your goal. Here’s my shop-floor breakdown:
| Technology | Full Name | How It Works (The Simple Version) |
|---|---|---|
| FDM | Fused Deposition Modeling | This is your desktop printer. It's a hot-glue gun that melts a spool of plastic (like ABS or PLA) and draws your part, layer by layer. |
| SLA | Stereolithography | This is the high-precision one. It uses a UV laser to draw on a bath of liquid photopolymer resin, hardening it one layer at a time. |
| SLS | Selective Laser Sintering | This is the workhorse. A powerful laser "sinters" (melts and fuses) a bed of nylon powder, layer by layer. The unsintered powder supports the part, so no support structures are needed. |
| DMLS | Direct Metal Laser Sintering | This is exactly what it sounds like. It's the SLS process, but instead of nylon, it's using a high-power laser to melt and fuse powdered metal, like Aluminum or Stainless Steel. |
The most important thing for an engineer to know is that each one has a different trade-off between cost, speed, surface finish, and strength.
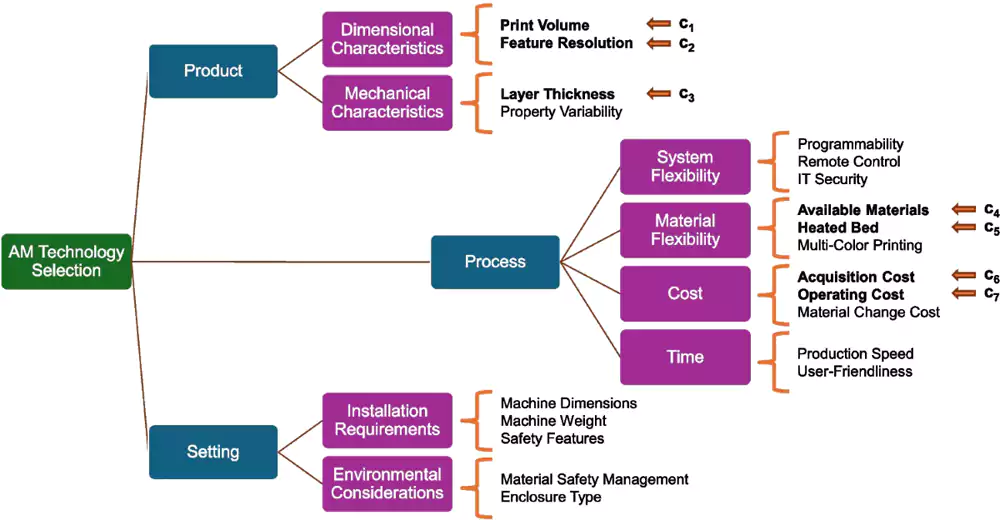
How Do You Choose the Right 3D Printing Method?
This is the big question. How do you decide which of those four technologies to use for your project?
The right method depends on your goal. Choose FDM for low-cost mockups, SLA for visual prototypes, SLS for functional testing, and DMLS for metal parts.
Diving Deeper into Choosing
When an engineer sends me a file, my first question is always the same: “What is this part for?” The answer tells me everything I need to know.
I just need to check the size and shape” (Form & Fit):
My Answer: Use FDM or SLA. FDM is cheap and fast, perfect for a 1-to-1 scale model. If you need to check how it feels in your hand or if you need a smooth finish for a marketing photo, use SLA. It gives you that beautiful, injection-mold-like surface.
I need to snap this together and see if the clips work” (Functional Testing):
My Answer: Use SLS. The parts made from sintered nylon (like PA12) are tough, flexible, and have real-world durability. You can drill them, tap them, and abuse them. This is what you use to build a functional, working prototype.
I need a part that can take heat and stress” (High-Performance Parts):
My Answer: This is where we talk about DMLS (for metal) or high-performance plastics like PEEK (on an FDM machine). DMLS is how we make lightweight aerospace brackets or custom medical implants. It’s a final production method, not just a prototype.
From the Shop Floor: A Case Study in Prototyping
A client (a fast-growing electronics company) was developing a new handheld industrial scanner. They had a beautiful design, and they were under pressure to get it to a trade show. They sent me the CAD file and asked for a quote to CNC machine the housing from a solid block of aluminum.
The “Shop-Floor” Intervention: My quote for the CNC prototype was high—about $2,500. It would take my 5-axis mill a full day to machine that complex, organic shape. I called the engineer and asked my simple question: “What is this for?” He said, “I just need to make sure my new PCB and battery pack fit before I cut the $10,000 injection mold.”
I told him to cancel the CNC order.
Our Solution: A $150 Print That Saved $10,000
Here’s the new plan I gave him. This is the power of rapid prototyping.
- Part: Handheld Scanner Enclosure (2 halves)
- Technology: SLA (Stereolithography)
- Material: ABS-like Photopolymer (We used a tough, white resin that simulates the feel and properties of the final plastic part).
- Critical Tolerances: We held ±0.1 mm on all the internal mounting bosses and the snap-fit locations.
- Timeline: We printed it overnight. Total time: 18 hours.
The Result: The client came in the next day. The parts looked beautiful—smooth and professional. He took them to his assembly bench. The PCB fit perfectly. The screen snapped in. But then… the battery cover wouldn’t close.
He found a 1.5mm interference between a battery clip and an internal screw boss. It was a simple design error, completely invisible in the CAD model, but a total show-stopper in the real world.
That $150, 18-hour print just saved him $10,000. If he had cut that steel mold, he would have had to pay for a $3,500 tooling modification and a 3-week delay. Instead, he fixed the CAD model in 20 minutes, and we had a new, perfect print for him the next day. That is the real magic of 3D printing.
What Are the Main Materials Used in 3D Printing?
You’re not just limited to plastic. The range of materials is what makes 3D printing so powerful for real-world engineering.
3D printing materials range from basic plastics (like PLA, ABS) and durable nylons to high-resolution resins, carbon-fiber composites, and even metals like aluminum, stainless steel, and titanium.


Diving Deeper into Materials
The material is tied to the process. Here’s a simple breakdown:
FDM (Filaments): This uses spools of plastic.
- PLA: Cheap, easy to print. Great for quick, non-functional models.
- ABS / ASA: More durable, better temperature resistance. What LEGOs are made of.
- PEEK / ULTEM: High-performance, high-temp polymers for aerospace and medical.
SLA (Resins): This uses liquid photopolymers.
- Standard Resins: Great for high detail and smooth finishes (visual models).
- Tough / Durable Resins: My favorite. These are “ABS-like” or “PP-like” and are fantastic for functional prototypes that need to flex or take an impact.
- Castable Resins: Used in jewelry. We print the part, then use it to make a “lost-wax” mold for casting gold or silver.
SLS (Powders):
- Nylon (PA12): This is the king. It’s strong, durable, heat-resistant, and slightly flexible. It’s the best all-around material for functional testing.
- Glass-Filled Nylon: We add glass fibers to the powder to make the final part much stiffer and stronger.
DMLS (Metal Powders):
- Aluminum (AlSi10Mg): Lightweight and strong. Great for aerospace and automotive.
- Stainless Steel (316L): The same 316L we machine. Great for corrosion resistance.
- Titanium (Ti64): The ultimate. Incredibly strong and lightweight, perfect for medical implants and high-end aerospace.
What Is the Future of 3D Printing?
Is this just for prototypes, or is it the future of all manufacturing?
The future of 3D printing is moving from just prototyping to full-scale “Additive Manufacturing.” This means faster machines, more advanced materials (like composites and bio-materials), and on-demand digital-N-to-N production.
Diving Deeper into What's Next
From my perspective on the shop floor, the future is already here, just not evenly distributed. The biggest change isn’t just the machines; it’s the mindset.
Localized, On-Demand Manufacturing
Why stock 10,000 spare parts in a warehouse? In the future, you’ll just have a digital file. When a part breaks, you’ll print a new one on-site. This is a huge deal for military, aerospace, and remote industries.
"Impossible" Designs
The most exciting part for me is “Generative Design.” This is where engineers use AI to design parts that are only possible to make with 3D printing. These parts look like spider webs or bone structures—they use the absolute minimum material needed for maximum strength. They are light, strong, and look like something out of a sci-fi movie.
Hybrid Manufacturing
This is what my shop is all about. We combine processes. We’ll 3D print a complex metal part with DMLS, and then we’ll put that same part into our 5-axis CNC mill to machine the critical tolerances on the bores and sealing faces. This “best of both worlds” approach is the true future of high-performance manufacturing.
How to Choose a 3D Printing Partner
When you’re outsourcing 3D printing, consider these key factors:
- Technical Capability: Can the company offer multiple printing methods (SLA, SLS, FDM, SLM) and handle your part size or complexity?
- Material Options: A good partner can recommend and supply suitable materials—whether metal, resin, or composite.
- Experience: Skilled engineers who understand tolerances, thermal stress, and design-for-additive principles will save you trouble down the line.
- Lead Time & Quality: On-time delivery and consistent quality control make a big difference, especially when you’re prototyping under a tight schedule.
At Allied Metal, we handle small-batch custom parts and prototypes using both metal and plastic 3D printing—ideal for testing new designs before committing to mass production.
Conclusion:
Look, here’s my bottom line after decades on the floor: 3D printing is not just a tool for toys or hobbyists. It is your smartest insurance policy against expensive design failure.
If you’re testing form, fit, or basic function, you simply cannot afford the risk of cutting a high-value prototype from billet aluminum or, worse, committing to an injection mold before you’ve validated your design with an inexpensive, fast print. Use the speed of FDM or the detail of SLA to fail fast, iterate quickly, and find your errors when they cost $150, not $10,000. Once your design is locked and proven, then we can talk about CNC machining it for production.
Ready to Validate Your Design?
Stop guessing and start proving. Send us your complex file and tell us what the part needs to do.
