7 Common CNC Tool Setting Methods: A Shop Veteran's Guide to Getting It Right
- November 13, 2024
- Tony
- Last updated on November 4, 2025 by Lucy
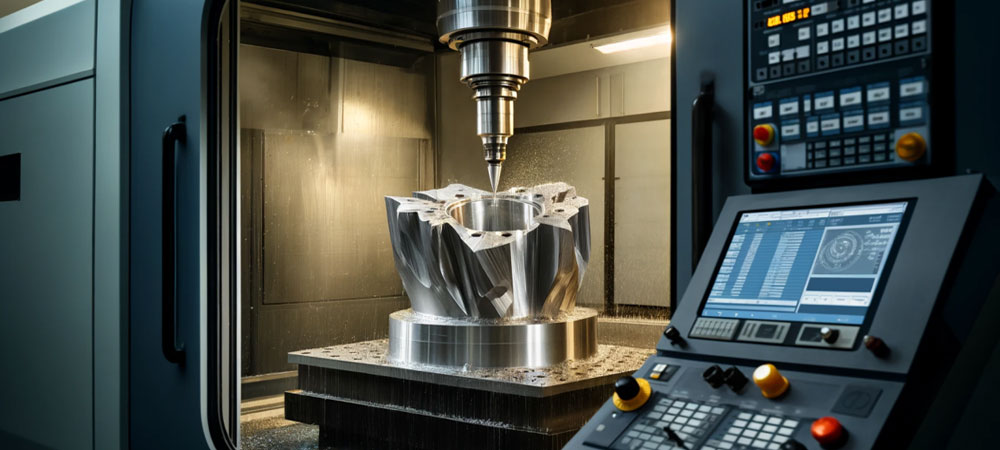
After 25 years running CNC machines, I can tell you this: tool setting isn’t just a step in the process – it’s the difference between a perfect part and scrap metal. Let me walk you through the methods I’ve used and trusted over the years.
1. what is tool setting?
Tool setting refers to measuring and setting the relative position between the tool and the workpiece in CNC machining.
Typically, the purpose of tool setting is to accurately position the tool in the intended location of the part to be machined and to ensure that the tool path matches the shape and dimensions of the workpiece accurately during the machining process.
Tool setting is a fundamental step in the CNC machining process, which directly affects the accuracy, efficiency and quality of machining.
Why Tool Setting Matters More Than You Think?
I’ve seen $5,000 parts ruined because someone rushed tool setting. Getting this right means:
- Consistent quality: Part 1 matches part 1,000
- Longer tool life: Proper setup prevents premature wear
- Fewer crashes: Accurate tools mean predictable results
- Better surface finishes: Right from the first part
2. Principle and purpose of CNC machining tool setting.
Principle of tool setting:
The principle of tool setting in CNC machining is based on measuring the relative coordinates of the tool to the workpiece and adjusting the coordinates using the CNC system.
Through tool setting, the operator is able to accurately set the tool’s working start point and machining path, thus ensuring that each step of the machining takes place in the expected area.
Purpose of tool setting:
- Ensure machining accuracy: Avoid deviations in the position of the tool and the workpiece, and avoid machining errors due to inaccurate positioning.
- Extend tool life: Reduce machining problems caused by tool damage or misalignment.
- Improve productivity: Reduce downtime due to tool problems and improve machining continuity.
3. 7 methods of CNC machining tool setting.
There are a variety of tool setting methods commonly used in CNC machining, below we introduce 7 of these common methods:
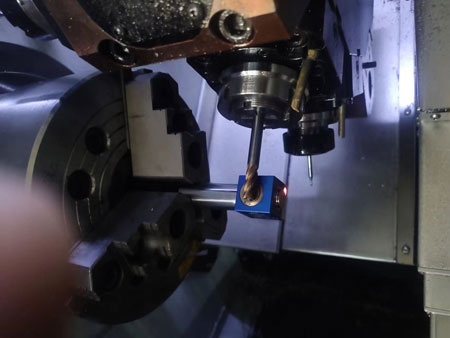
1. Touch probe method
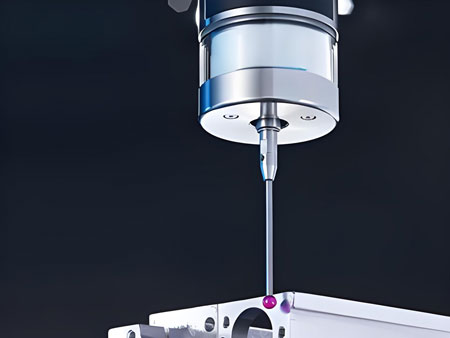
The touch probe is used to determine the coordinate position of the workpiece or tool by touching its surface. When the probe touches the surface of the workpiece, the sensor sends a signal to the CNC to determine the exact position of the tool. This method is usually used for more complex or higher precision machining.
- Advantages: High precision, applicable to a wide range of workpieces.
- Disadvantages: Higher equipment costs and complicated operation.
2. Laser tool setting
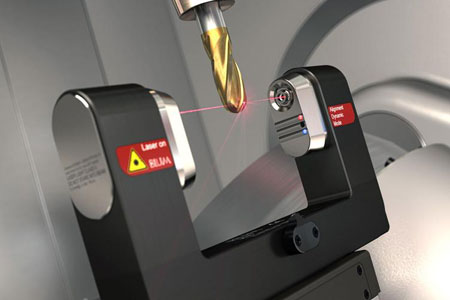
The laser tool setting method is to irradiate the tool and workpiece by a laser beam and use the reflected signal of the laser to measure the relative position of the tool. This method enables non-contact tool setting and is particularly suitable for high-speed machining.
- Advantages: non-contact, fast speed, high precision.
- Disadvantages: requires laser equipment support, high cost.
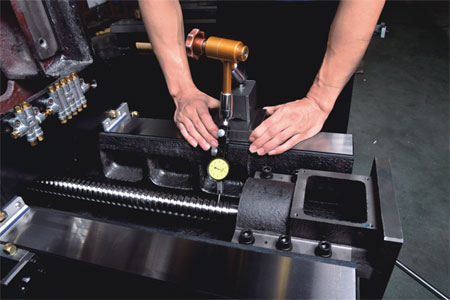
3. Mechanical tool setting method
The mechanical tool setting method is the most traditional method of tool setting, in which the tool is mechanically aligned with the coordinates of the workpiece through the use of a standard tool setting block or tool setting instrument. This method is relatively simple and suitable for small batch production and workpieces with low accuracy requirements.
- Advantages: simple and easy to operate, low cost.
- Disadvantages: Manual operation can easily lead to errors and lower precision.
4. Optical tool setting method
Photoelectric tool setting method is a commonly used CNC milling tool setting method. When the tool touches the photoelectric tool setting bar, the sensor detects and stops it automatically. This method is suitable for high-speed machining and mass production.
- Advantages: real-time feedback, high precision.
- Disadvantages: higher equipment costs, greater environmental interference.
5. Software simulation tool setting method
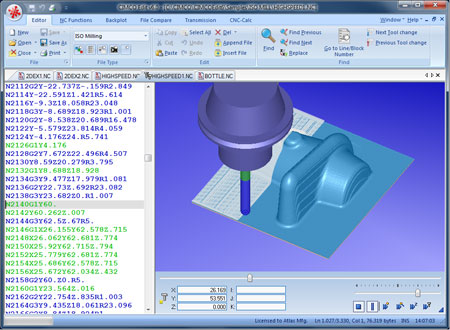
Through the tool path simulation software, using the computing power of the CNC system and software accuracy, simulate the contact and relative motion of the tool and the workpiece, so as to accurately determine the position of the tool. This method improves the accuracy and efficiency of cutting operations and is widely used in high-end CNC systems.
- Advantages: Does not require physical contact and is suitable for complex machining.
- Disadvantages: Requires a high performance CNC and slower processing speeds.
6. Mechanical tool measuring instrument method
This method performs accurate measurement of the tool by means of a mechanical measuring instrument, which is commonly used in the machining of precision parts. It locates the tool and workpiece by means of a high-precision measuring tool.
- Advantages: High precision, suitable for high demand machining.
- Disadvantages: troublesome to operate, limited scope of application.
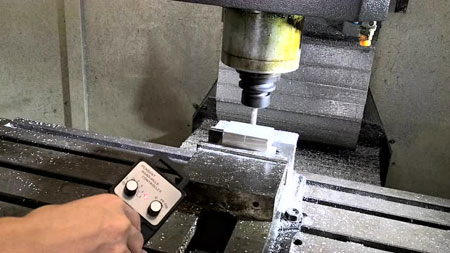
7. Manual calibration method

The test-cut method is a commonly used tool setting method, which is divided into two types: relative and absolute. The operator determines the position of the tool by cutting the workpiece, suitable for simple machining, especially in the economic CNC machine tools commonly used.
Relative test cutting method: the use of gauges (such as steel plate ruler) to directly measure the size of the tool, easy to operate but less accurate.
Absolute test cutting method: through the “test cutting – measurement – adjustment” method, set the tool deviation, high precision but low efficiency.
Advantages: simple operation, less equipment requirements, suitable for low-precision machining and small batch production.
- Disadvantages: Lower precision, lower efficiency, taking up machine time.
📌Case Study: Aerospace Impeller Manufacturing
The Challenge: We had to machine 500 titanium impellers for helicopter engines. Each part required 14 different tools with tight radial and axial tolerances. A single tool setting error could scrap a $2,500 part.
Our Solution: We implemented a combined approach using tool presetter and machine probing.
Tool Setting Process:
- Pre-setting: All 14 tools measured offline with Zoller presetter
- Length accuracy: ±0.003mm
- Radius measurement: ±0.002mm
- Runout check: < 0.005mm TIR
- Machine verification: Renishaw probe on machine verified each tool
- Length confirmation within 0.008mm of the presetter
- Radial compensation adjusted for machine thermal growth
- In-process monitoring: Tool wear sensors tracked during machining
- Expected tool life: 45 parts per edge
- Actual achieved: 52 parts per edge
- Automatic compensation for wear
- Results:
- Setup time reduced from 45 to 12 minutes
- First-part success rate: 100% (vs. 85% with manual methods)
- Tool life increased by 15% through better settings
- Scrap rate dropped from 3% to 0.2%
- Total cost savings: $18,500 over the production run
The key was using the presetter for initial accuracy and the machine probe to account for thermal effects. This combination gave us the best of both worlds.
4. What I've Learned About Each Method
Manual Methods Still Have Their Place
Even with all the technology, sometimes you just need to feel the tool touch the part. It’s faster for simple jobs.
Presetters Pay for Themselves
A good presetter costs about $25,000 – but it pays for itself in 6 months through reduced setup time and fewer crashes
Probes Aren't Perfect
Machine probes are great, but they’re affected by temperature and machine condition. Always verify critical tools.
Consistency Beats Absolute Accuracy
What matters most is that every tool is set the same way every time. A consistent error is better than random accuracy.
5. Common Mistakes I See
Rushing the Process
I’ve seen operators try to save 2 minutes on setup and waste 2 hours fixing crashes.
Not Accounting for Thermal Growth
Tools and machines change size as they warm up. The first part of the day often measures different from the tenth.
Ignoring Tool Runout
A tool that’s not running true will never cut right, no matter how accurately you set it.
Forgetting About Tool Pressure
Some tools deflect under cutting pressure. You need to account for this in your offsets.
6. My Perspective on Tool Setup
For Job Shops
Start with a good presetter and manual methods for backup. You’ll handle 95% of work perfectly.
For Production Shops
Invest in automated probing and laser systems. The ROI comes from faster changeovers.
For High-Precision Work
Use multiple methods and cross-check. I often use presetter, probe, and manual verification for critical tools.
7. The Future of Tool Setting
What's Coming?
- Wireless tool communication: Tools that tell the machine their dimensions
- AI-assisted setting: Systems that learn from past jobs
- Integrated measurement: Tools with built-in sensors
What Stays the Same?
No technology replaces understanding the fundamentals. You still need to know what a properly set tool feels like.
Summary
Good tool setting is like a good foundation – you don’t see it, but everything depends on it. I’ve built my career on getting this right, and it’s never let me down.
The right method depends on your parts, your equipment, and your people. But no matter what, take the time to do it right.
