ISO 286 is a global standard that defines tolerances and fits, which are crucial for part design and machining accuracy in manufacturing. Tolerances directly affect a part’s performance, assembly quality, and the product’s lifespan.
1. Overview
What is ISO 286?
ISO 286 is an international standard that defines tolerances for mechanical parts, used in engineering, manufacturing, and product design.Its goal is to ensure parts fit together accurately.

Key points of ISO 286:
- Tolerance classes: It defines tolerance classes for holes and shafts to help designers choose the right range for part dimensions.
- Dimensional deviations: It provides tables for the upper and lower limits of hole and shaft sizes to ensure parts are made with the right accuracy.
- Fit assurance: It ensures that shafts and holes from different manufacturers or countries will fit together properly, avoiding assembly issues.
Key Terms
- Tolerance zone: The range within which a part’s actual dimensions can vary.
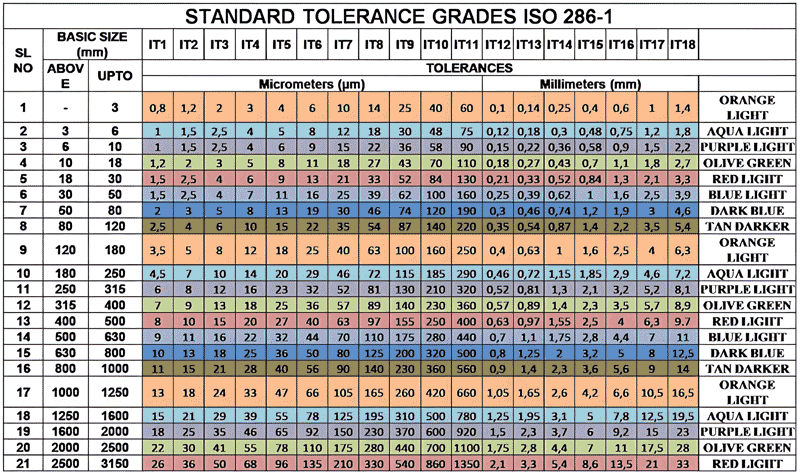
- IT grade: Represents the precision level of a tolerance. A smaller IT grade means a tighter tolerance and higher precision.
- Hole and Shaft Fit: The relationship between the hole and shaft in assembly, including interference fit, clearance fit, etc.
- Base Size: The design size of a part, used as the reference for all tolerance calculations.
2. The importance of the ISO 286 tolerance standard in manufacturing
ISO 286 ensures that parts meet design accuracy, preventing fits that are too loose or too tight, which can impact product performance and assembly.
Using this standard improves product quality, reduces waste, and boosts productivity and cost-effectiveness.
3. Development history
- 1974 – Introduced
ISO 286 was first published to standardize dimensional and fit tolerances for mechanical parts, aiming to ensure consistency across global manufacturing. - 1980s – Early Adoption and Revisions
The standard gained widespread use, introducing the tolerance grades (IT grades) for holes and shafts to improve precision in manufacturing. - 1991 – ISO 286-1:1991
Updates to the tolerance system, refining deviation tables for hole and shaft dimensions to align with advanced manufacturing methods. - 2008 – ISO 286-1:2008 & ISO 286-2:2008
Further revisions clarified tolerance selection and fit between holes and shafts, improving accuracy in global manufacturing. - 2010s – Global Standardization
It became crucial for international trade, ensuring parts from different countries fit together correctly. It was adapted for new manufacturing technologies like 3D printing. - 2020s – Ongoing Relevance
Standards are constantly updated and remain key to modern manufacturing, supporting precision and compatibility in a globalized production environment.
4. Classification
Basic Dimensions and Tolerance Zones
The base dimension is the design size of a part, and all tolerances are based on it. Tolerance zones define the permissible variation in part dimensions around the base dimension.
Tolerance grades (IT grades)

IT grades, ranging from IT0 (highest accuracy) to IT16 (lowest accuracy), help determine the required precision. Choosing the right IT grade ensures parts meet functional needs without over-specifying accuracy.
Hole and shaft fits
Hole and shaft fits define the clearance or interference between parts during assembly. Different types of fits, such as interference or clearance fits, are selected based on assembly requirements.
Difference between dimensional and form tolerances

Dimensional tolerances define variations in size, while form tolerances address shape requirements like flatness and roundness. While this standard focus is primarily on dimensional tolerances, form tolerances are also crucial in design.
5. Specific contents of the ISO 286 standard
This standard focuses on defining and managing tolerance zones, offering methods for selecting the appropriate tolerance based on the part’s functional requirements.
Classification of tolerance zones
Tolerance zones are based on the base size and IT grade. Larger base sizes lead to wider tolerance ranges, and lower IT grades require higher precision.
Application scenarios of different tolerance zones
In precision instruments, smaller tolerance zones (e.g., IT5 or IT6) are used for high accuracy, while larger zones (e.g., IT10 or IT11) are used in construction machinery to reduce production costs.
How to select the appropriate tolerance according to ISO 286?
Designers should consider the part’s function, assembly needs, and production costs. Relaxed tolerances can lower costs, while overly strict tolerances may cause waste and machining issues.
6. ISO 286 VS. other tolerance standards.
1. ANSI/ASME (USA)

ANSI and ASME standards (e.g., ASME B4.1, ASME Y14.5) focus on tolerances and fits, similar to ISO 286, but include more details on geometric tolerancing (GD&T). There are minor differences in terminology and application.
2. DIN (Germany)

DIN ISO 286 aligns closely following the same tolerance framework with some specific focus on German applications.
3. JIS (Japan)

Japan’s JIS B 0401 covers dimensional tolerances similarly to ISO 286, with slight differences in terminology and limits.
4. National Standards (Other Countries)
Many national standards (e.g., BS, AS) align with ISO 286 but may have minor differences in terminology or tolerance values.
5. GD&T

While ISO 286 handles basic dimensional tolerances, GD&T(Geometric Dimensions and Tolerances) (ISO 1101) defines tolerances for form, orientation, and location in more complex geometries.
7. How to apply ISO 286 tolerance standard for part design?
- Tolerance Considerations
Engineers must understand the part’s function, assembly, and performance needs when choosing tolerances to ensure accuracy and minimize manufacturing costs. - Balancing Accuracy with Cost
Tighter tolerances increase production costs, so designers must balance accuracy with cost based on the part’s requirements. - Example
In the automotive industry, engine parts require high precision. Selecting the right IT grade can meet accuracy needs without driving up costs. - Applications
It is widely used in machining, automotive, aerospace, and precision instruments to ensure precise part fits in various environments.
8. FAQ about ISO 286
1. How to understand and apply complex tolerance requirements in ISO 286?
This standard tolerance requirements can be complex, especially for hole-shaft fits. Designers should refer to the standard’s tables and examples to select the right tolerance zones and fit types.
2. Effects of too tight or too wide tolerances
Tight tolerances increase costs and are harder to achieve, while wide tolerances may result in poor fits. It’s crucial to select the correct tolerance range to balance both factors.
3. How to deal with tolerance problems in actual production?
In production, tolerance issues may require adjustments to machining, improving equipment accuracy, or revisiting design requirements to maintain quality.
4. What are the main differences between hole and shaft tolerance classes in ISO 286?
Hole tolerance ranges are usually larger, while shaft tolerances are smaller, ensuring a proper fit and accurate assembly between parts.
