Author's Note: Last updated on May 20, 2026, by Lucy
Many machining problems do not start with the CNC lathe itself. They usually begin with the wrong insert geometry, poor holder stability, or incorrect cutting parameters.
The best turning tool is the one that matches the workpiece material, machining operation, surface finish target, and machine condition. Correct tool selection improves machining stability, reduces cycle time, extends insert life, and lowers overall production cost.

I have worked with shops that spent thousands on new CNC equipment while still struggling with unstable machining and short tool life. In many cases, the real problem was poor tooling selection. A well-matched turning tool setup can improve productivity faster than upgrading the machine itself.
What Factors Matter Most When Choosing Turning Tools?
Many turning problems happen because the tooling choice does not match the real machining conditions.
When choosing turning tools, engineers should focus on workpiece material, machining operation, surface finish requirements, machine rigidity, productivity goals, and tooling cost over the full production cycle.

The wrong insert may still cut material, but it often creates vibration, poor chip control, short tool life, and unstable dimensions. I usually start by understanding the material first, then I match the insert geometry and holder style to the actual machining conditions. This approach creates more stable results during both prototyping and production.
Workpiece Material
Different materials create different cutting challenges. Aluminum is soft and tends to stick to cutting edges.1 Stainless steel generates heat quickly. Titanium creates vibration and concentrated heat at the tool edge. Hardened steel causes abrasive wear.
| Material | Main Challenge | Recommended Tool Style |
|---|---|---|
| Aluminum | Built-up edge | Sharp polished carbide or PCD |
| Stainless Steel | Heat and work hardening | Coated carbide with positive rake |
| Titanium Alloy | Heat concentration | Tough carbide with stable holder |
| Hardened Steel | Abrasive wear | CBN inserts |
Machining Operations
Roughing and finishing require completely different tooling strategies. Roughing inserts focus on edge strength and material removal. Finishing inserts focus on dimensional control and surface quality.
Surface Finish Requirements
Not every part needs ultra-fine surface finishes. Over-specifying finish quality often increases machining time and tooling cost unnecessarily.
Tool Life vs Productivity
A cheaper insert does not always reduce cost. Inserts that last longer and allow higher cutting speeds often reduce total production cost significantly.
Cost Efficiency in Production
Real machining cost includes:
- Tool replacement time
- Machine downtime
- Scrap parts
- Cycle time
- Surface rework
This is why I rarely evaluate tooling only by insert price.
Common Turning Tool Selection Mistakes
The most common mistakes I see include:
- Using weak insert geometry during heavy roughing
- Choosing large nose radii on unstable setups
- Ignoring machine rigidity
- Running excessive cutting speed
- Using the same insert for all materials
I once worked with a customer machining stainless steel pump shafts. They selected a low-cost insert to reduce tooling expense. Insert wear increased rapidly, surface finish became inconsistent, and production delays followed within two weeks.
For engineers comparing broader tooling categories, understanding the different CNC cutting tools used across machining operations can also help improve tooling decisions during part planning.
What Are the Main Types of CNC Turning Tools and Inserts?
Different turning operations need different insert geometries, holder designs, and cutting edge strengths.
External turning, boring, grooving, threading, and finishing tools are designed for specific machining tasks. Insert shape and nose radius directly affect chip control, cutting pressure, and surface finish quality.
Many tooling problems become easier to solve once you understand how each insert style behaves under cutting pressure. I often see shops using general-purpose inserts for every operation. That usually limits both machining quality and productivity.
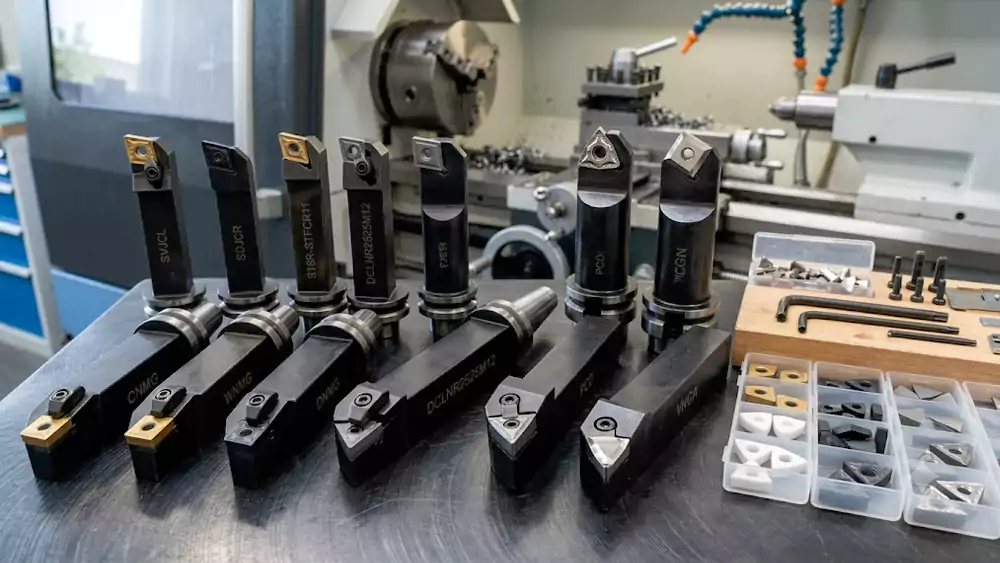
External Turning Tools
External turning tools machine outside diameters, profiles, tapers, and shoulders. These are the most commonly used turning tools in CNC machining.
Internal Boring Tools
Boring bars machine internal diameters and internal profiles. Long overhangs increase vibration risk, so holder rigidity becomes extremely important.
Grooving and Parting Tools
Grooving tools create narrow channels, while parting tools separate finished components from stock material. Chip evacuation is critical during these operations.
Threading Tools
Threading inserts machine internal and external threads. Full-profile threading inserts usually provide more consistent thread quality in production environments.
Finishing Tools
Finishing inserts use sharper cutting edges and lighter feed rates to improve dimensional consistency and surface finish quality.
Indexable vs Solid Turning Tools
| Tool Type | Advantages | Limitations |
|---|---|---|
| Indexable Tools | Lower long-term cost and quick insert replacement | Slightly lower rigidity |
| Solid Tools | Higher rigidity and precision | Higher replacement cost |
Indexable carbide tooling remains the most common solution in modern CNC turning production.
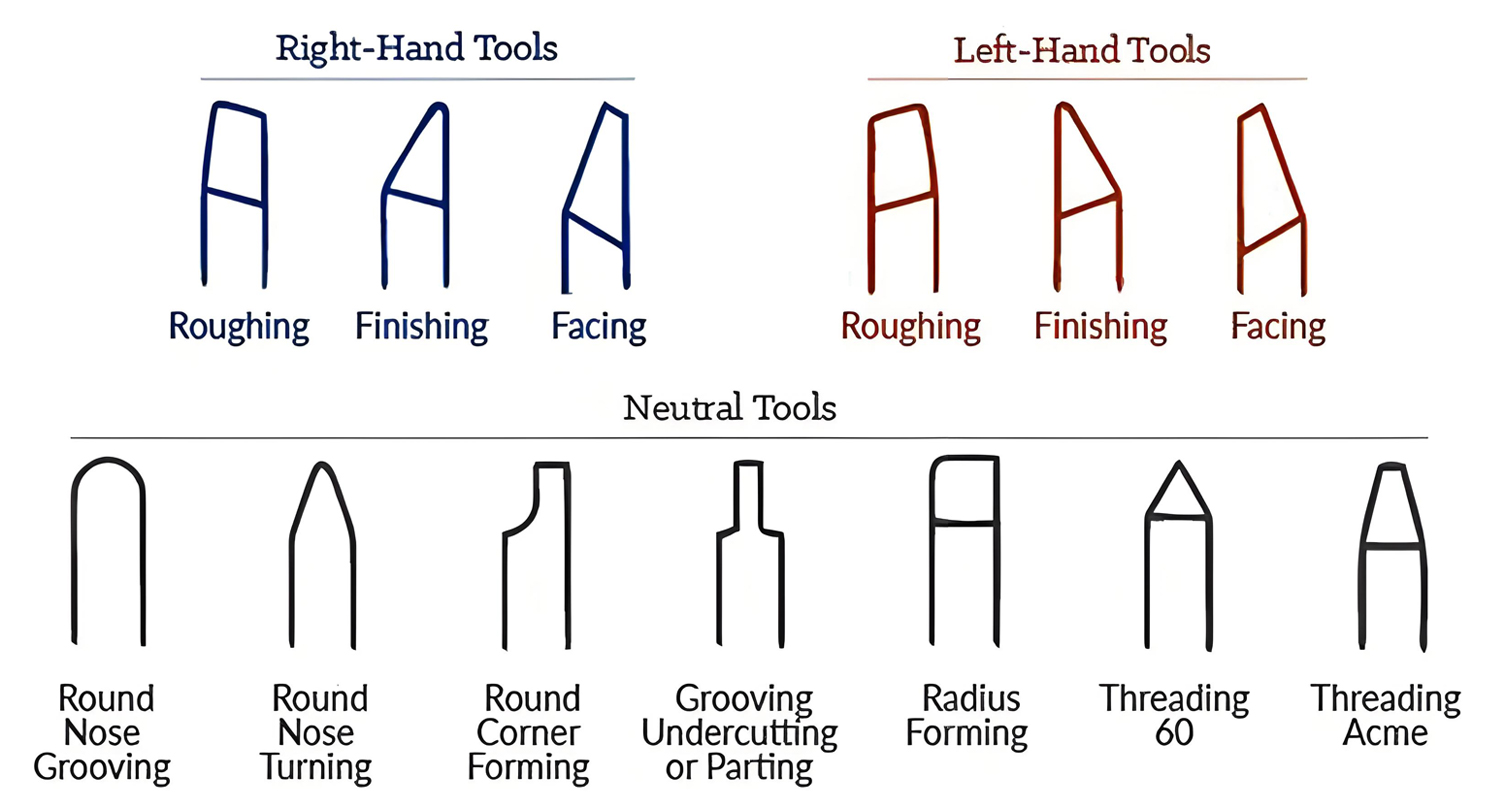
Understanding Turning Insert Shapes
C Inserts
C-shaped inserts provide strong cutting edges and versatile machining performance for general turning.
D Inserts
D inserts provide better profiling capability and improved finishing access.
V Inserts
V inserts work well for sharp corners and complex profiles but have weaker edge strength.
W Inserts
W inserts provide more usable cutting edges per insert and improve insert economy.
Insert Nose Radius Selection
Roughing Applications
Large nose radii improve edge strength and support heavier cutting loads2.
Finishing Applications
Smaller nose radii reduce cutting pressure and improve fine-detail surface finishing.
How Do Material and Machine Conditions Affect Tool Selection?
Even premium inserts perform poorly when machine conditions are unstable or incorrectly matched.
Tool performance depends on both the workpiece material and machine condition. Rigidity, spindle power, coolant delivery, and cutting speed all directly influence insert life, surface finish, and machining stability.

I have seen identical inserts perform completely differently on two machines running the same material. One machine produced stable chips and excellent finishes. The other created chatter and premature insert failure because of weaker rigidity and coolant delivery.
Turning Tools for Aluminum
Aluminum requires sharp cutting edges and strong chip evacuation performance. Polished inserts reduce material adhesion and improve surface finish quality.
Turning Tools for Stainless Steel
Stainless steel creates heat quickly and tends to work harden during cutting. Positive rake geometry and heat-resistant coatings usually perform best.
Turning Tools for Titanium Alloys
Titanium alloys concentrate heat near the cutting edge. Stable holders and controlled cutting speeds are essential for reliable machining.
Turning Tools for Hardened Steel
Hard turning often requires CBN inserts and highly rigid machine conditions3 to maintain dimensional accuracy and prevent vibration.
Machine Rigidity and Stability
Weak machine setups often require:
- Lower feed rates
- Reduced depth of cut
- Smaller nose radii
- More stable holders
Spindle Speed and Power
High-speed turning requires balanced tooling and sufficient spindle stability. Underpowered machines struggle during aggressive roughing operations.
Coolant Systems
- Heat control
- Chip evacuation
- Tool life
- Surface finish quality
Through-coolant tooling performs especially well in stainless steel and titanium machining.
High-Speed CNC Turning
High-speed machining improves productivity but also increases thermal load on inserts. Correct coating selection becomes more important at higher cutting speeds.
Choosing Tools for Roughing vs Finishing
High Material Removal Applications
Use stronger insert geometries and larger depth-of-cut capability.
Precision Surface Finishing
Use sharp cutting edges and lighter feed rates.
Tight-Tolerance Machining
Thermal stability and vibration control become extremely important.
Real Production Case Study
Several years ago, I worked on a hydraulic valve body project that clearly showed how tooling optimization affects production cost.
| Parameter | Initial Setup | Optimized Setup |
|---|---|---|
| Material | 17-4 PH Stainless Steel | 17-4 PH Stainless Steel |
| Insert Type | Standard CNMG Insert | Premium WNMG Coated Carbide |
| Cutting Speed | 140 m/min | 210 m/min |
| Feed Rate | 0.18 mm/rev | 0.24 mm/rev |
| Tool Life | 42 parts | 115 parts |
| Surface Finish | Ra 2.1 μm | Ra 0.9 μm |
| Cycle Time | 11.5 min | 8.2 min |
The insert price increased slightly, but total production cost dropped by nearly 18% because cycle time and downtime improved significantly.
What Tool Materials, Coatings, and Holders Should You Choose?
Modern CNC turning performance depends heavily on insert material, coating technology, and holder stability.
Carbide inserts are the standard choice for most CNC turning operations, while ceramic, CBN, and PCD tools are better for specialized materials, high-speed machining, and hardened metals. Correct coatings and stable holders greatly improve tool life and surface finish quality.
Tooling technology has improved rapidly during the past decade. Modern coatings and anti-vibration holders allow shops to machine faster while maintaining tighter tolerances and longer insert life.
Carbide vs Ceramic vs CBN Tools
| Tool Material | Best Application | Main Advantage |
|---|---|---|
| Carbide | General machining | Versatility |
| Ceramic | High-speed hard material machining | Heat resistance |
| CBN | Hardened steel turning | Extreme wear resistance |
Carbide still dominates most production turning because it balances cost, toughness, and machining flexibility very well.
PCD Tools for Non-Ferrous Metals
PCD tools are ideal for:
- Aluminum
- Copper
- Graphite
- Composite materials
They provide excellent surface finishes and extremely long tool life during high-volume production.
PVD vs CVD Coatings
| Coating Type | Main Benefit |
|---|---|
| PVD | Sharp edge retention |
| CVD | High wear resistance |
PVD coatings are commonly used for finishing applications, while CVD coatings perform well during heavy roughing.
Anti-Vibration Tool Holders
Anti-vibration holders reduce chatter during:
- Deep internal boring
- Long overhang machining
- High-speed finishing
Stable holders protect both inserts and machine spindles.
Through-Coolant Tooling
Internal coolant channels improve heat removal and chip evacuation. This becomes especially important during stainless steel and titanium machining.
Quick-Change Tooling Systems
Quick-change systems reduce setup time and improve repeatability during production changeovers.
How Coatings Affect Tool Life and Surface Finish
Good coatings reduce friction and cutting heat. This improves:
- Tool life
- Surface quality
- Machining stability
- Cutting speed capability
Still, coatings cannot compensate for poor insert geometry or unstable machine conditions.
FAQs
What is the best turning tool material for stainless steel?
Coated carbide inserts with positive rake geometry normally provide the best balance between machining stability, tool life, and cost efficiency.
How do I select the correct insert geometry?
Start with the workpiece material, machining operation, and machine rigidity. Then match the insert shape, rake angle, and nose radius to the cutting conditions.
Which insert is best for finishing?
Sharp positive inserts with smaller nose radii generally provide the best surface finish quality.
What causes insert wear during turning?
Excessive heat, vibration, incorrect cutting speed, poor coolant flow, and improper insert geometry are the most common causes.
Are coated inserts always better?
No. Some aluminum applications perform better with polished uncoated inserts because coatings may increase material adhesion.
How often should turning inserts be replaced?
Replace inserts when surface finish, dimensional consistency, or cutting stability begins to decline. Waiting too long often increases scrap rates and machine downtime.
Conclusion
Choosing the right turning tool is not only about cutting metal faster. It is about building a stable, repeatable, and cost-efficient machining process. When insert geometry, coating, holder stability, coolant delivery, and machine conditions all work together, production becomes smoother, surface quality improves, and long-term manufacturing costs drop significantly.

-
"Built-up edge", https://en.wikipedia.org/wiki/Built-up_edge. A materials-machining reference should document that aluminum alloys have a tendency toward adhesion and built-up edge formation during cutting, especially under unfavorable tool geometry, speed, or lubrication conditions. Evidence role: mechanism; source type: education. Supports: Aluminum is soft and tends to stick to cutting edges.. Scope note: The tendency varies by aluminum alloy, cutting speed, tool coating, and coolant/lubrication conditions. ↩
-
"How to choose correct turning insert - Sandvik Coromant", https://www.sandvik.coromant.com/en-us/knowledge/general-turning/how-to-choose-correct-turning-insert. Machining references on turning insert geometry state that a larger tool nose radius distributes cutting forces over a broader edge and is commonly associated with stronger edges suitable for roughing and heavier feeds. Evidence role: mechanism; source type: education. Supports: Large nose radii improve edge strength and support heavier cutting loads.. Scope note: This is a general tooling principle; excessive nose radius can increase radial cutting forces and chatter risk on less rigid setups. ↩
-
"CBN Inserts for Hard Turning: A Complete Guide - ZYsuperhard", https://zydiamondtools.com/how-can-you-maximize-hard-turning-success-with-cbn-inserts-from-selection-to-troubleshooting/. Hard-turning literature identifies cubic boron nitride tools and high static and dynamic machine-tool rigidity as common requirements for machining hardened steels with acceptable accuracy and surface integrity; this is a general practice statement rather than a universal requirement for all hard-turning operations. Evidence role: expert_consensus; source type: paper. Supports: Hard turning often requires CBN inserts and highly rigid machine conditions to maintain dimensional accuracy and prevent vibration.. Scope note: Some hardened-steel operations may use ceramics, coated carbides, or grinding depending on hardness, tolerance, and production economics. ↩
