Last updated on March 12, 2026, by Lucy
Tool breakage, unstable cuts, and poor roughing results often come from choosing the wrong milling strategy. Many engineers overlook one classic method that still solves these problems: up milling.
Up milling (also called conventional milling) is a CNC machining method where the milling cutter rotates opposite to the direction of the workpiece feed. During cutting, chip thickness starts very thin and gradually increases to its maximum, which creates gradual tool engagement and stable cutting conditions. Because of this behavior, up milling is commonly used for rough machining, castings, forgings, and machines with backlash where climb milling could cause instability.
Although modern CNC machines frequently use climb milling for finishing, up milling still plays an important role in many machining processes. Understanding when and why to use it can improve cutting stability, reduce tool breakage, and extend tool life.
What Is Up Milling and How Does It Work in CNC Machining?
Many CNC beginners hear about climb milling first and assume it is always the better option. However, ignoring up milling can lead to unstable roughing and unnecessary tool damage.
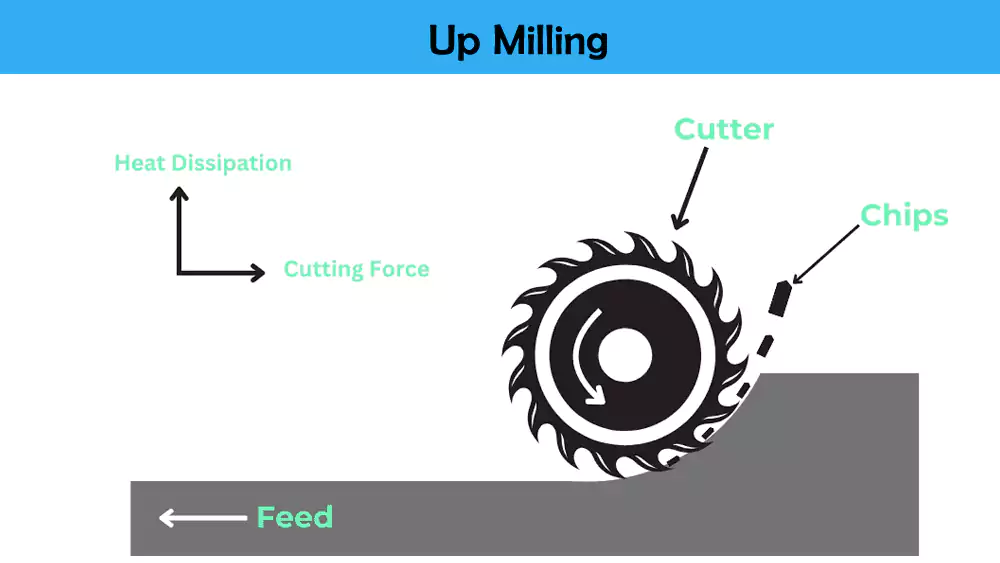
Up milling, also known as conventional milling, is a milling process where the cutter rotates against the feed direction of the workpiece. The cutting edge begins with nearly zero chip thickness and gradually increases to maximum thickness as the cutter exits the material. This thin-to-thick chip formation creates gradual engagement between the tool and the workpiece, making up milling suitable for rough surfaces and less rigid machines.
Cutter Rotation vs Feed Direction
In up milling, the rotation direction of the cutter is opposite to the feed direction of the workpiece.
As the cutting edge first contacts the surface, it slides along the material before fully removing chips. This causes the tool to gradually engage the workpiece rather than cutting aggressively from the beginning.
Because the cutter pushes against the workpiece feed direction, it prevents the tool from pulling the part forward unexpectedly. This behavior is one of the reasons up milling has traditionally been considered safer on less rigid machines.
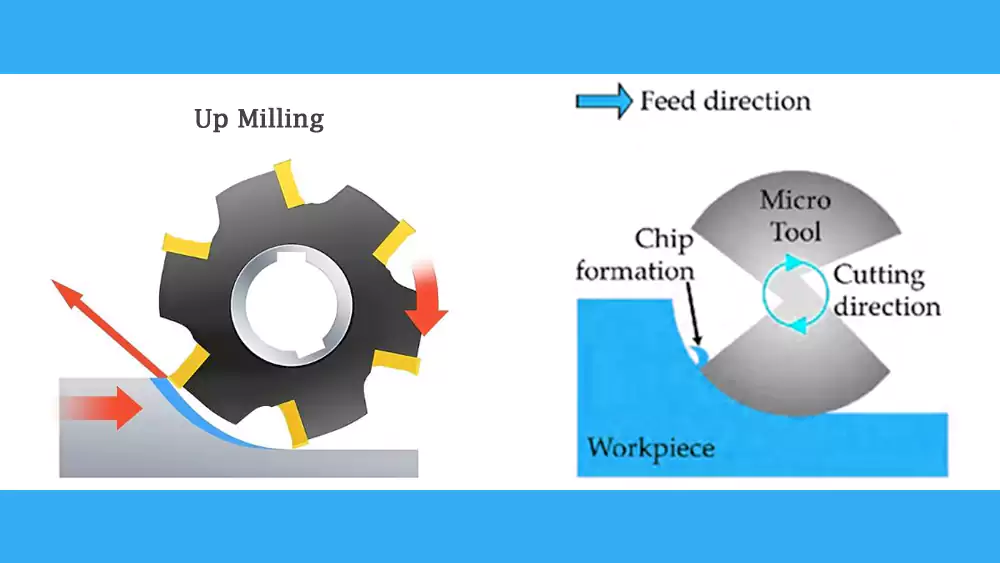
Chip Thickness Behavior (Thin → Thick)
A defining feature of up milling is its chip formation pattern.
| Cutting Stage | Chip Thickness |
|---|---|
| Tool Entry | Near zero (very thin) |
| Middle of Cut | Gradually increasing |
| Tool Exit | Maximum thickness |
This thin-to-thick chip formation causes some friction at the beginning of the cut, but it also allows smoother engagement when machining rough surfaces.
Why It Is Called Conventional Milling
Up milling became known as conventional milling because it was the standard method used before modern CNC machines were widely adopted.
Older milling machines often had backlash in their lead screws1. If climb milling were used on these machines, the cutter could suddenly pull the workpiece into the tool, causing unstable cutting.
Up milling avoided this issue because the cutting force pushes against the feed direction rather than pulling the part forward.
Common Applications of Up Milling
Up milling is still commonly used in several machining situations:
- Rough machining operations
- Machining castings and forgings
- Cutting surfaces with oxide layers or scale
- Machining parts with uneven or rough surfaces
- Working on machines with mechanical backlash
Up Milling vs Down Milling: Key Differences in Cutting Mechanics
Choosing between up milling and down milling can significantly affect machining quality, tool wear, and production efficiency.
The primary difference between up milling and down milling lies in chip formation and cutting force direction. Up milling produces chips that grow from thin to thick as the cutter exits the material, while climb milling produces chips that start thick and become thinner. Because climb milling removes material immediately instead of rubbing the surface, it generally provides better surface finish, lower cutting forces, and longer tool life on modern CNC machines.

Key Differences Between Up Milling and Down Milling
| Factor | Up Milling (Conventional Milling) | Down Milling (Climb Milling) |
|---|---|---|
| Chip Thickness | Thin → Thick | Thick → Thin |
| Surface Finish | Lower | Better |
| Tool Wear | Higher | Lower |
| Cutting Forces | Higher | Lower |
| Machine Requirement | Lower rigidity acceptable | Requires rigid CNC machines |
Why Modern CNC Machines Prefer Climb Milling
Modern CNC machines are designed with:
- High structural rigidity2
- Precision ball screws
- Minimal mechanical backlash
These improvements allow climb milling to perform safely and efficiently.
Because the cutter engages the material at maximum chip thickness immediately, climb milling reduces friction between the tool and the surface. This results in:
- Better surface finish
- Reduced cutting temperature
- Longer tool life
- Higher machining efficiency
For these reasons, most CNC machining operations prefer climb milling for finishing passes.
Why Up Milling Still Matters
Despite the advantages of climb milling, up milling remains valuable in several real-world machining situations.
It is often more stable when cutting rough surfaces, scale layers, or cast materials. In these cases, the gradual engagement of up milling helps prevent sudden tool damage.
Many machinists therefore still rely on up milling during initial roughing operations3.
Advantages and Disadvantages of Up Milling
Up milling can improve machining stability in certain conditions, but it also introduces some trade-offs.
Up milling offers gradual cutting engagement, which improves stability when machining rough surfaces or working on machines with backlash. However, because the cutting edge initially rubs the surface before removing material, it typically produces lower surface finish, higher cutting forces, and faster tool wear compared with climb milling.
Advantages of Up Milling
Up milling offers several benefits in practical machining environments.
First, it provides safer tool engagement. The cutter gradually enters the material instead of cutting aggressively at the start.
Second, it performs well on rough or scaled surfaces, such as castings or forged parts.
Third, it is compatible with machines that have backlash, which makes it suitable for older milling equipment.
Key advantages include:
- Gradual cutting engagement
- Better performance on rough surfaces
- Reduced risk of sudden tool grabbing
- Compatibility with machines that have backlash
Disadvantages of Up Milling
However, up milling also has some limitations.
Because the cutting edge initially slides across the surface before forming chips, friction is higher at the beginning of the cut. This can lead to higher temperatures and faster tool wear.
Additionally, up milling typically produces lower surface finish quality compared with climb milling.
Common disadvantages include:
- Poorer surface finish
- Higher cutting forces
- Faster tool wear
- Lower machining efficiency
For this reason, most modern CNC machining operations prefer climb milling for finishing operations.
When Should You Use Up Milling for Custom CNC Parts?
Not every machining process benefits from climb milling. In some cases, up milling actually improves stability and reliability.
Up milling is best used during rough machining operations, when cutting castings or forgings, or when machining surfaces with oxide layers. It is also useful when working on machines with backlash where climb milling may cause unstable cutting. In these situations, the gradual engagement of up milling helps protect the tool and maintain stable machining conditions.
Typical Scenarios Where Up Milling Works Better
Up milling performs well in several manufacturing scenarios.
Common examples include:
- Rough machining operations
- Machining cast iron components
- Aluminum cast housings4
- Forged parts with rough surfaces
- Parts with oxide layers or scale
- Older machines with backlash
These conditions often involve irregular surfaces where gradual tool engagement improves cutting stability.
Case Study: Up Milling for Automotive Transmission Housing
Consider the machining of an automotive transmission housing made from aluminum casting.
The raw casting typically has rough surfaces and oxide layers that can damage cutting tools during aggressive machining.
A typical machining strategy includes:
- Roughing stage — Up milling
- Semi-finishing stage — Controlled machining
- Finishing stage — Climb milling
Using up milling during the roughing stage helps stabilize cutting and protect the tool edges. Once the rough surface is removed, climb milling can then produce a high-quality finish.
This approach results in:
- More stable cutting conditions
- Improved tool life
- Better final surface finish
Choosing the Right Milling Strategy for CNC Machining
In real CNC machining workflows, engineers rarely rely on only one milling strategy.
A typical process often looks like this:
| Machining Stage | Recommended Milling Strategy |
|---|---|
| Roughing | Up Milling |
| Finishing | Down Milling (Climb Milling) |
Experienced CNC machinists often combine both milling strategies to balance cutting stability, surface finish, and tool life.
Engineering Insight
Up milling is my insurance policy for rough cuts. It costs a little in efficiency, but it saves a lot in broken tools and scrapped parts.
Conclusion
Up milling remains an important machining strategy, particularly for rough machining, cast surfaces, and machines with backlash. While climb milling dominates modern finishing operations, combining both methods often produces the best machining results. If you're working on a project with challenging materials or tight tolerances, I'd be happy to talk about how we handle these decisions at Allied Metal—just send over your drawings and we'll find the right approach for your custom CNC machined parts.

--
-
Learn why up milling is safer on machines with lead screw backlash and how it prevents unstable cutting. ↩
-
Explore how high structural rigidity in CNC machines enables safer and more efficient climb milling operations. ↩
-
Learn why up milling is favored during initial roughing to handle rough surfaces and prevent tool damage effectively. ↩
-
Learn the detailed processing specifics of aluminum materials and how to obtain a precision aluminum casting. ↩
